Saturday, October 23, 2010

Cookie Week Entry 2 - Peanut Butter Cookies w/ Hershey Kisses

People in the Western part of the world have been enjoying peanut butter for hundreds of years.  The Aztec Native Americans crushed peanuts to create a peanut butter paste that was enjoyed by many.  Today the United States and China are the two countries that lead peanut butter production.  Today we just go to grocery store and pick out our favorite peanut butter to use for sandwiches and other things like baking cookies!!
Here is a recipe for delicious peanut butter cookies, which are only made better with a Hershey kiss on top!


Ingredients:
  • 1/2 cup butter or margarine, softened
  • 3/4 cup peanut butter  (I use Jif- in my opinion there is no better!)
  • 1/2 cup white sugar
  • 1/2 cup packed brown sugar
  • 1 egg
  • 1 teaspoon vanilla extract
  • 3/4 teaspoon baking soda
  • 1/4 teaspoon salt
  • 1 3/4 cups all-purpose flour
  • 1 bag of Hershey kisses
Directions:
Preheat oven to 350 degrees.
Combine margarine, peanut butter, sugars, egg, and vanilla. Blend together very well.
Add flour, baking soda and salt with mixer.
Chill dough for a minimum of 1 hour in the refrigerator.
While dough is chilling, use this time to unwrap your bag of Hershey kisses.  Be sure to get all foil pieces off the chocolate and into the trash.
Use scoop to portion out 1 tablespoon sized balls. Place on parchment lined cookie sheet and bake until edges are lightly brown (about 7 to 9 minutes). Don't overcook!
Immediately place a single Hershey kiss on each of the peanut butter cookies.  Push down on the Hershey kiss so that it is firmly in place.
*You can also chose to not to put kisses on the cookies leaving them to be plain (but delicious) peanut butter cookies.*

Let cookies cool on cookie sheet for 2-3 minutes.
Remove cookies and place on a cooling rack.


COOKING TIP!
As mentioned in this recipe- use parchment paper!
Whenever you bake cookies - any recipe will direct you to either grease or not to grease the cookie sheet that you are using.  If you are using parchment paper it doesn’t matter.
In fact, parchment paper allows a more even cooking for your cookies.  It also allows the cookies to be easily removed from the cookie sheet after baking.  Then- you just need to use a new piece of parchment before baking your next batch… no washing needed.
Parchment paper is a simple trick that will make your cookie baking experience better.

Simply cut parchment paper to fit any size cookie sheet.

Thursday, October 21, 2010

Cookie Week Entry 1 - Chocolate Chip Cookies


There is never a substitute for a good old fashioned chocolate chip cookie.  I would have assumed that chocolate chip cookies have been around for hundreds of years… but that is incorrect.  The chocolate chip cookie originated in the 1930’s at a place called the “Toll House Inn” in Massachusetts.  (It is no coincidence that Nestle Chocolate Chips contain a version of this recipe called “Toll House Chocolate Chip Cookies”  on the back of every package of chips that they sell - The Toll House Inn used Nestle chocolate!)

I love to make chocolate chip cooks for every occasion, every holiday, and… for no reason at all!
(not that you should eat uncooked cookie dough since it uses raw eggs - the dough tastes great too!)


Ingredients:
·         2 ¼ c. flour
·         1 c. brown sugar
·         ¾ c. white granulated sugar
·         2 t. salt
·         2 t. baking soda
·         1 c. butter flavored Crisco (you could use any other butter/margarine/shortening but it won’t be the same)
·         1 additional T. of butter (don’t substitute something else!)
·         2 large eggs
·         2 t. vanilla extract
·         1 bag (11.5 oz) of milk chocolate chips

Directions:
Preheat oven to 375 degrees.

In a small dish beat the eggs and vanilla.  Set aside.
In a large mixing bowl combine brown sugar, sugar, salt, baking soda, shortening & butter (all), and the beaten eggs/vanilla.
Cream ingredients together.
Fold in flour.  (many like to add ½ of the flour first, mix, and then add the rest)
After your batter is completely done - add chocolate chips and mix one last time.

Chill dough for 1 hour (minimum) before baking.  **This is important!**

Using a small scoop (tablespoon size), place rounded balls of cookie dough on a parchment paper lined cookie sheet.  The cookies cook best when the balls are slightly larger than a tablespoon.
Bake for 9-11 minutes.
The cookies will begin to brown on the edges and patches in the middle of the cookie.  That’s when they are done (even though there might be a few spaces that don’t look like they are cooked).  The catch with this recipe is “do not over bake.”  If you don’t over bake the cookies will stay soft.

Let cookies cool on cookie sheet for 2-3 minutes.
Remove cookies and place on a cooling rack.


Additional variations.
·         Semi-Sweet Chocolate Chips
·         Butterscotch Chips
·         White Chocolate Chips
·         Peanut Butter Chips
·         Chocolate/Peanut Butter Chips
·         Chocolate Chunks
·         Mini Chocolate Chips

You can even use this same dough to make an M&M cookie.  Just use 2 ½  cups (they are chunkier so you need to use more) of plain M&M candies instead of chocolate chips!

COOKING TIP!
As mentioned in this recipe- there is a product called “Butter Flavored Crisco.”  Many people have probably seen it in the stores - but I find that not many have actually used it.  When making cookies, this product is PERFECT!  Not only do you get a rich butter flavor in the cookie, you also get a softness (after baking) that comes with shortening.  Some might say that there is no substitute for butter… but I think in this case there is!!
Try it the next time your cookie recipe calls for butter or margarine!

Thursday, October 14, 2010

Pumpkin Sundae

The last of the warm falls days are gone… yes… it’s sad and true.  You can still warm up with this ‘Warm Pumpkin Sundae’ recipe. 


Have you ever been to a restaurant and enjoyed an item SO MUCH that you know you need to figure out a way to concoct the fantastic item when you get home?  That is the case with this item!  One of my favorite restaurants in Minneapolis had this dessert on their lunch menu.  Wow.  The warmth of them pumpkin, the richness of some vanilla, and the sweetness of maple all tied in to one- it couldn’t be better  (not to mention DELICIOUS) !


The fall is the perfect time for pumpkin flavored treats - in any country!  I say that because while doing my research on this recipe I uncovered a fun fact: Of the seven continents, Antarctica is the only continent that does not (and can not) produce Pumpkins!  That means hundreds of countries could enjoy this excellent dessert!


Pumpkin Bars
(much more like Pumpkin Pie than your traditional ‘cake like’ Pumpkin Bar)
Once you have your pumpkin bars complete it is all about putting your completed desert together by using a few ingredients.

Ingredients
·         1 Box Plain Yellow Cake Mix
·         4 Eggs
·         1 c. Brown Sugar
·         30 oz. Pumpkin (2 regular size cans or 1 large can)
·         ¾ c. Butter or Margarine
·         2/3 c. Milk
·         2 T. Cinnamon
·         ½ c. Brown Sugar


Directions
Reserve 1 c. of the cake mix.
Melt ½ c. of the butter or margarine (save ¼ c. for later).
Mix the ½ c. melted bugger or margarine with the remaining cake mix, and 1 beaten egg.
(mixture will be like a cookie dough texture)
Generously grease the bottom and sides of a 9 x 13 cake pan.
Place doughy mixture in the bottom of the cake pan - carefully spreading to create a crust layer over the bottom of the entire pan.

Mix the pumpkin with the 1 c. brown sugar, three beaten eggs, milk, cinnamon.  Pour over the crust in the pan.

Mix the remaining yellow cake mix, the ¼ c. butter or margarine, and the ½ c. brown sugar.
Crumble mixture over the pumpkin layer. (mixture will be moist - so crumbling is expected to be difficult)

Bake at 350 for 50-60 minutes.  (pumpkin will still look soft in the oven)
Cool before serving.  Bars actually work best if you make them, chill them overnight, and then cut and re-heat slightly before serving.


It’s All About The Presentation!
Use the following directions to make the most out of your new pumpkin dessert.

1)      In a bowl take a bit of maple syrup.  Line the bottom of the bowl.  (about a ¼ of an inch - but that all depends on how big your bowl is too)
2)      Then place one square of your pumpkin bar in the syrup
3)      Warm in microwave for 30 seconds
4)      Garnish with a scoop of vanilla bean gelato (ice cream works too- but its not as great)
5)      Top with whipped crème
6)      Add crumbled graham cracker or a graham cracker triangle for show (it tastes good too!)


Anyone who loves a pumpkin flavored desert will be sure to enjoy. 
While all the ingredients in this dessert are fairly straight forward - I do think it is the combination of all of the items together - especially with the maple syrup (which is the true treasure in this dessert) - that makes this a winner for any fall dinner (or lunch)!

Friday, October 8, 2010

Apples...

Did you know that the apple tree originated in Western Asia?  I suppose the folklore of ‘Johnny Appleseed’ could really be true!  (and it is… partially-  John Chapman was his name - and he cultivated some of the first apple tree’s in Illinois, Ohio, and Indiana)
Asia still has strong roots in the apple business.  China is the leading producer of apples in the world!  We don’t see much of that, as the United States is second.  (Iran is third… WHO KNEW!)

The fall in Minnesota yields an almost infectious ‘apple fever’.  There are plenty of orchards to visit, seasonal varieties of apples that people go nuts over (honeycrisp anyone?), and of course lots of great apple recipes.  I love just about any recipe that contains fresh apple.
The smell of apples and cinnamon is one of my personal favorites.

Today we taste some fresh apple crisp.
I love apple crisp.  I have used many recipes over the years.  Some are better than others - but they are all good.  The thing that I have noticed really being different about some of the recipes is the number of steps it takes to make the crisp.
Where I come from apple crisp isn’t around long enough to make it worth spending hours in the kitchen on a complex recipe.  The crisp will gone before you know it!  That’s why I love this apple crisp recipe.  I used to call it ‘Simple Apple Crisp’ or ‘Easy Apple Crisp’ - but it’s the only one I make any more!

Apple crisp goes really well with a nice cup of coffee.  Not a coffee drinker?  Have some APPLE CIDER with your crisp!  After the apple crisp recipe I have included my favorite way to warm up (and spice up some apple cider)!


Apple Crisp


Ingredients:
·         3-4 medium honeycrisp apples
·         2 medium/large granny smith apples
·         1 c. brown  sugar
·         ½ c. flour
·         ½ c. quick cooking oats
·         ¾ c. butter
·         1 and ½ T. cinnamon
·         ½ t. nutmeg (or use ¾ t. if you want a more savory taste)

Instructions:
Preheat oven to 375 degrees.
Grease/spray 8x8 baking pan. 

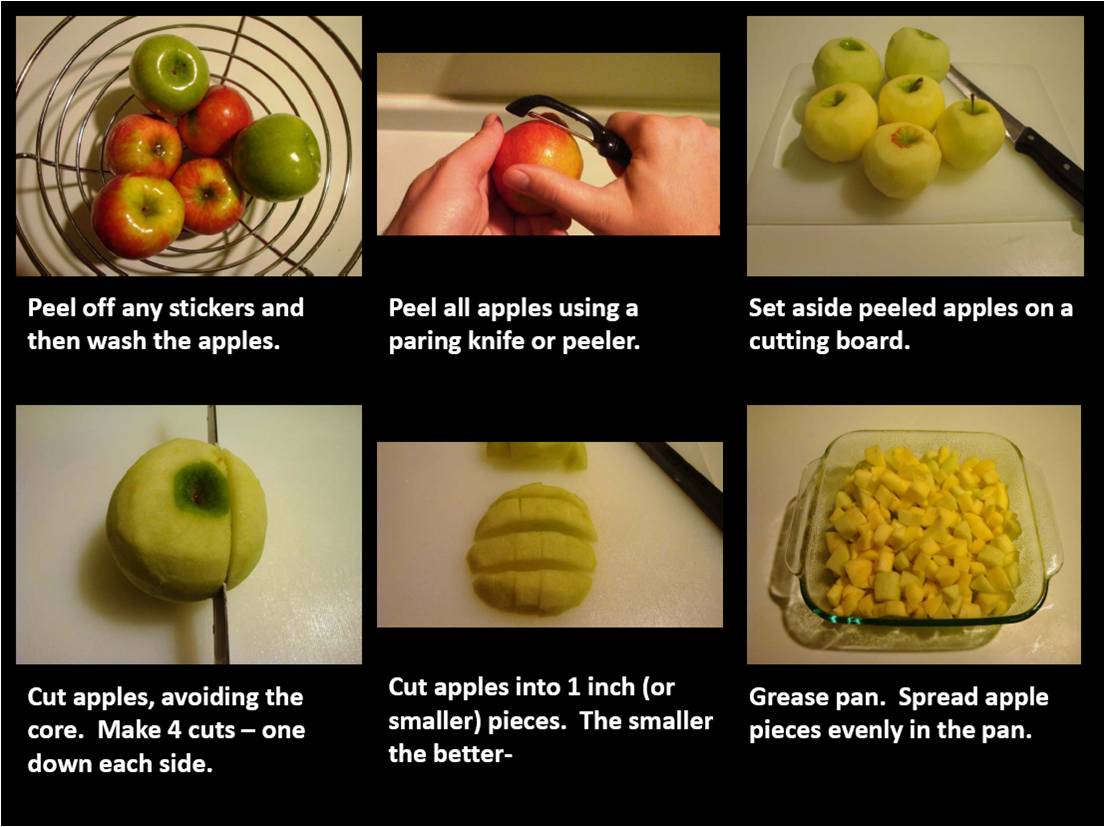
Peel any stickers off the apples.  Wash & peel.
Cut apples (avoid the core).  Dice apples into 1 inch (or smaller) pieces.  *You don’t want them too big.*
Spread apples evenly into the pan.


In a bowl, combine all the dry ingredients.  Mix well.  Cream the butter into the dry ingredients.  Mix thoroughly.  Spread/crumble the topping over the apples evenly.
Cover with aluminum foil.

Bake at 375 for 20 minutes.
Remove foil.  Bake for an additional 15-20 minutes.
Cool for 5+ minutes before serving - serve warm.  Serve with vanilla ice cream if desired!

To Save Even More Time - Try This Product!
I discovered a great product last year.  It is a ‘ready made’ apple crisp mixture.  Add butter and apples and you are ready to go!  It tastes almost the same - but you are ready in about half the time!

Marzetti Apple Crisp

Look for it in the grocery store - I have found it at several stores in the produce area right by the apples!
I would definitely recommend this product.


-----     -----     -----     -----     -----     -----     -----     -----     -----     ----     -----

I have always wondered what the difference between Apple Cider and Apple Juice is.  Depending on who you ask you can get a different answer.  It is as clear as mud.
Fundamentally, if you are talking about 100% pure juice or cider - it is the same thing… just processed differently. 
Apple juice is strained a bit more to have less pulp - but that’s it.
At this time of the year it isn’t uncommon to see “Apple Cider” that looks just like “Apple Juice”.  Buy the cheaper one - it’s the same thing!

If you really want the true ‘cider’ experience you need to look at color.  Here is a fun (and corny) phrase that I heard once-
If it's clear and yellar, you got juice there fellar,
If it's tangy and brown, you're in cider town.

In any event- juice or cider (I say you should buy what ever is cheaper), flavor it up with the recipe below!


Apple Cider


Ingredients:
·         ½ gallon of Apple Cider
·         1 T. whole cloves
·         2-3 T. of cinnamon (or you can use 5 cinnamon sticks)
·         ½ t. of nutmeg (nutmeg is strong, so I recommend starting with ½ - you can add another ½ if you desire
·         ¼ c. brown sugar
·         3 T. cranberry juice
·         Zest of one medium orange
·         1 container of fresh (or your can use 1 c. of frozen) blackberries

Instructions:
Pour the apple cider into a large cooking pot (one that has a lid).
Add all of your ingredients - stirring in the brown sugar, cinnamon and nutmeg so that the majority of it will dissolve in the cider.
Using a large spoon, crush the blackberries into the mixture.

Simmer on a medium low heat.  We want the mix to get close to a boil - but not all the way.  Apple cider mixed with these ingredients can boil over and make a mess if you aren’t careful.
I always suggest that you simmer for at least 30 minutes.
Not only do you want the mix to be piping hot - but you will love the way your house smells too!

When you are ready to serve, run the pot of cider through a strainer to collect any blackberry seeds, cloves, or un-dissolved cinnamon/nutmeg sediment.

Serve in your favorite mug with a cinnamon stick, a dash of nutmeg, or even some whipped crème.
(or all three!)
-----     -----     -----     -----     -----     -----     -----     -----     -----     ----     -----

Spice it up even more…Adults Only!
A spiced cider with some BRANDY is also great!
Take this same recipe but add 1 cup (or more) before you heat it.  It will definitely warm you up!

As the leaves change colors, the days get shorter, and the weather gets considerably colder - stay warm and enjoy some good food!
Until next week!


Friday, October 1, 2010

Monkey Bread


The weather in Minnesota has started to cool down, and as the leaves on the trees begin to change it is evident that Fall is here.  I think that Fall is a great time of the year, and more importantly Fall is definitely one of my most favorite times in the kitchen!  (There are so many great treats to make!)  The first recipe of my new blog needed to be perfect.  I think this one is.  Monkey Bread!
I will never forget mornings when Mom would make this delicious treat for us.  It something that you want to keep eating, and eating, and eating…  (and I did!)  This is something that I learned how to make for myself when I was in 7th grade.  Yup- 12 years old and learned how to make this on my own!

This recipe is not Mom’s - but its close.  I have modified the recipe a little over the years.  There is also a version at the end “with a twist”.  Check it out!

Remember, this bread is perfect to share with a group!  Have some people over for coffee, bring it to the office - you are sure to please your friends… or even make some new ones!!

Monkey Bread
Ingredients:
To prepare the bread-
·         3 packages (or tubes) of refrigerated biscuit dough
(use 4 if they are the smaller tubes that are sold in the multi pack)
·         1 c. white sugar
·         1 T. cinnamon
To make the caramel sauce-
·         1 c. butter (2 sticks)
·         ¾ c. brown sugar
·         ½ c. white sugar
Additional ingredients-
·         1 c. Chopped nuts - if desired (walnuts or pecans work best)

Instructions:
Preheat oven to 350 degrees.
Grease pan.  *A bundt pan may be the most traditional way to make this, but a regular old cake pan, bread loaf pan, or other baking container would also work just fine!*
Once you grease your bundt pan, place chopped nuts in the bottom of the pan (spread evenly) if you plan on using nuts.

Mix white sugar and cinnamon (to coat your biscuit pieces) in a bowl.

Open all refrigerated biscuit dough, separate out the biscuits.
Cut biscuits.  Small/Regular biscuits should be cut in 4.  Large/Grande biscuits should be cut in 6.
Roll all pieces into balls.

Take 6-10 of the individually rolled balls and place them in the mixture.  Roll the bowl around until all the biscuit pieces have been coated with the cinnamon sugar.  As you are done, the pieces can be placed into the bundt pan.  Keep in mind that you want to space the pieces out evenly.
DO NOT PACK THEM DOWN.  Gently place them in.
The pan will not look full.  This is okay.  The pieces expand to double their size!

To make your caramel sauce, melt your butter on medium-low heat in a saucepan on the stove.  Once the butter is melted continue to heat while adding the sugar and brown sugar.  Bring mixture to a simmer while continuously stirring.  Once the mixture remains at a constant bubbling consistency while stirring, remove from heat.
Pour entire caramel mixture evenly over your bundt pan full of cinnamon sugar pieces.

Bake at 350 for 35 minutes.
Cool for 5+ minutes - then turn out onto plate or serving tray.
Scoop out any remaining nuts and/or caramel from the bundt pan.  Be sure to add this back on top of your Monkey Bread - it’s the best part!!


-----     -----     -----     -----     -----     -----     -----     -----     -----     ----     -----

Monkey… WITH A TWIST!
Now some people may read this and think… “I have made monkey bread before…”
This is a popular breakfast time treat.  (It does very well with coffee!!)  I chose this recipe for the first entry of the blog because of this fun little twist - make MONKEY MUFFINS!


Instructions:
Instead of putting all your cinnamon sugar coated pieces in one giant bundt pan - instead grab your favorite muffin tin and get ready for some fun!
*You can grease your tin, but it will be easier for everyone if you use a double lined cupcake wrapper for this one!*

Place 4-5 pieces in each muffin cup.  (it will look a little lop sided- this is okay)
Then place approximately 1 tablespoon of your caramel sauce in each muffin cup trying to coat the top of all the exposes pieces.  Don’t be stingy - but you can use too much too!
**top with nuts if desired**

Bake the muffins for 15-18 minutes.
When removing muffins from the muffin tin BE CAREFUL.  They will be hot… and the caramel within the cups is even hotter.  It will cause a pretty bad burn if you aren’t careful.
Place muffins on a baking sheet to cool.


-----     -----     -----     -----     -----     -----     -----     -----     -----     ----     -----

One additional tip!
Your local grocery store will give out their bakery boxes for free!  (just ask nicely)
These boxes are perfect to place your Monkey Bread or Monkey Muffins in for transporting.
You can line the box with parchment paper or waxed paper to keep it cleaner!

These muffins are great for a weekend party, a brunch-time gathering, or just to take to the office for a surprise treat on Friday (my co-workers all will agree)!!
If you decide to make any of these treats be sure to sign on to the blog and make a comment.  I am always interested in what people have to say!
Oh- and have fun!  J